Strategy
Tactics aunties at every Singapore family table swear by, distilled. None of it is gospel — mahjong is part skill, part read, part the universe deciding whether you got dealt a fourth dragon.
The first rule: count tai before every move
Default house rules require 1 tai to win. A "chicken hand" — all chow, no honors, no animals, no flowers — is worthless. Before drawing, look at your hand and ask: can I get to 1 tai? If not, you need to either (a) pivot to a single-suit half-color, (b) target a dragon or seat-wind triplet, or (c) accept that you'll be the one paying out this round.
Picking your direction in the first 5 turns
You'll be dealt 13 tiles. The first 4–5 turns reveal what shape the hand wants to take. Common directions:
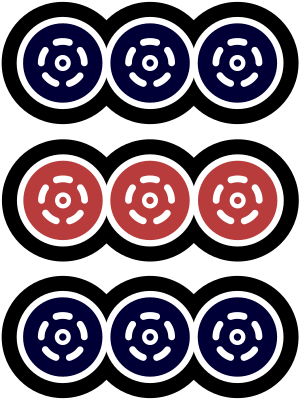
All chow — if you're dealt several runs in one or two suits, default to chow. Fast to complete, low pay (1 tai), reliable:


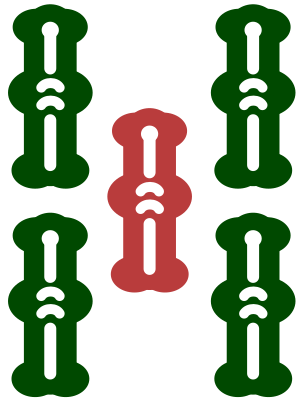


All pong — if you have multiple pairs early, dig for triplets. Slower, +2 tai, and the door opens to specials:


Half color (one suit + honors) — if 8+ of your 13 tiles are in one suit, lean in. +2 tai, and Full Color (+4) is a real chase if you can shed the few off-suit tiles:
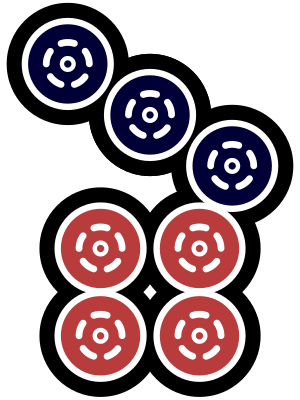

Dragon pong chase — if you've been dealt 2 of any dragon, holding for the third is almost always worth it. Each dragon pong is +1, plus opens Big/Small Three Dragons:
need one more 中Reading discards
The discard pile is the only public information at the table. Use it.
- Suit-leans: a player who never discards bamboo is collecting bamboo. Don't feed them bamboo tiles, especially terminals (1-bam and 9-bam).
- Honor caution: if East has discarded their seat wind early, they're not going for a wind triplet. If they're holding it, they probably are.
- Dragon discards: dragons discarded early = no dragon hand from that player. Late dragons = either they had to break a pair or someone else fed them the 3rd before they could complete.
The fourth dragon trap
When two dragons of the same kind are showing on the table (in someone's exposed pong, or in the discards), the remaining two are radioactive. Discarding the 3rd to a player with the exposed pair means you owe the entire payout — pay-all (bao). Hold the 3rd dragon longer than feels comfortable when you see this state.
opponent's exposed pong⚠ radioactive — don't discard thisWind tiles by seat
Your seat wind matters. East's seat wind is east (東), South's is south (南), etc. A pong/kong of your seat wind is +1 tai. The prevailing wind (which round of the game) is also +1 tai independently. If you're East in an East round and you triple east winds, that's +2 from one set.


Conversely: if you're North and you draw an east wind, it's worthless to you and possibly dangerous (East might want it). Discard early.
Flowers and animals — passive bonuses
Flowers, seasons, and animals are draws-of-luck — you can't strategise for them. But each one matched to your seat wind (e.g. plum flower if you're East, since plum maps to position 1 = East) is +1 tai. A complete set (all four flowers, seasons, or animals) adds +1 extra:


Always reveal them when drawn and take the replacement tile — the replacement might be the tile you needed.
Defensive play — when to give up the win
Sometimes the right move is to not feed the opponent. Indicators:
- An opponent has 3+ exposed melds (chow/pong) — they're 1–2 tiles from winning.
- Their last 2-3 discards are all from a single suit other than the one they're collecting — they've shed everything irrelevant.
- The wall is running low (under 20 tiles) — fewer chances for you to recover.
In these states, switch to safe discards: tiles that have been discarded multiple times already (very low chance of completing anyone's hand), and avoid tiles in suits the dangerous player is hoarding. You may give up your own win, but you avoid the big payout.
Self-draw vs discard win
Self-draw (zi mo, 自摸) pays double from each opponent. Discard win pays double from the discarder, normal from the others. So if you can wait one more turn for your own draw, the math says wait — you pull from 3 wallets instead of 1.
The catch: someone else might win first, or they might discard the tile you're waiting on. Hand-reading and counting how many of your wait tile are still live (not in discards or melds) tells you whether to grab the discard or pass for self-draw.
The chicken's not always wrong
If you've gotten a sub-par hand and your tai count is barely scraping 1, it's tempting to chase a bigger hand. Often the right call is to just take the chicken win — close the round, stop the bleeding, and let the next deal save you. A 1-tai win still costs nothing, while chasing a 4-tai hand and giving up a 4-tai hand to someone else costs you twice.